Camera settings
Most webcam adjustments — framing, lighting, background blur, reactions, even Center Stage tracking — live in macOS, not in Screen Cut Pro. Once Screen Cut Pro has access to the camera, those system controls apply to your recording.
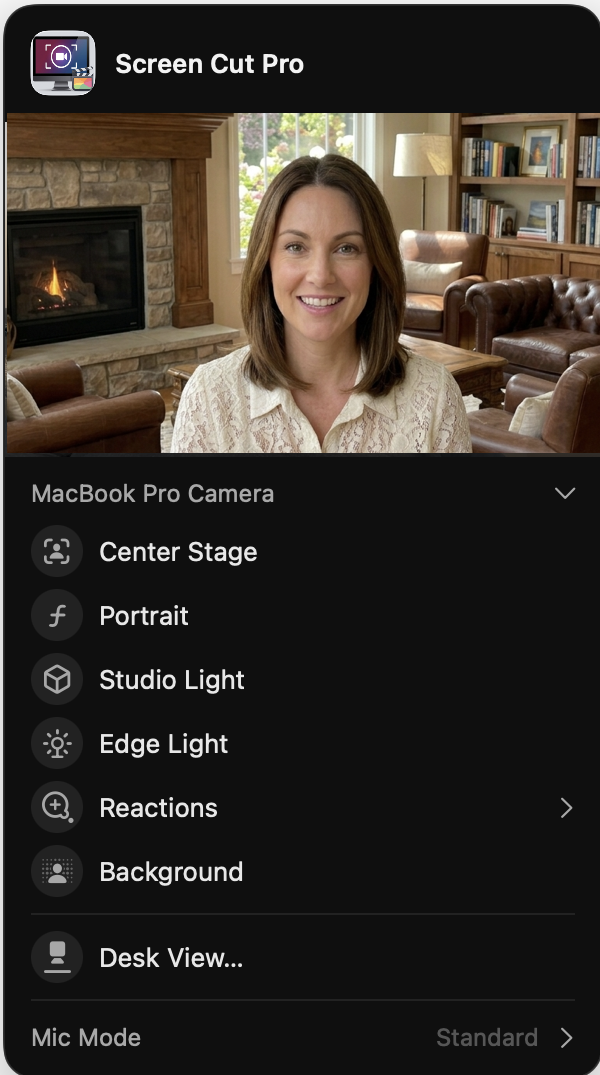
Opening the camera control panel
While Screen Cut Pro is using the camera, a green dot appears in your menu bar (top-right). Click it — you’ll see a Video tile labeled Screen Cut Pro. Click that tile to open the panel above. Adjustments take effect immediately and are reflected in Screen Cut Pro’s preview window.
Same panel is also available from Control Center → Video Effects when a camera is in use.
Zoom & recenter
The slider above the camera selector zooms the camera digitally (e.g. 0.5×–2×, depending on your hardware). The Recenter button on the live preview re-frames the subject to the middle of the shot — handy if Center Stage has drifted to follow a movement and you want it to reset.
Camera selector
The dropdown labeled with your current camera (e.g. MacBook Pro Camera) lists every camera macOS knows about — built-in, Continuity Camera (your iPhone), USB cameras, capture cards. Switching here changes which camera Screen Cut Pro is recording from for the rest of the session. Mid-recording swaps aren’t recommended.
Effects
The toggles below the camera selector are Apple’s built-in video effects. Each one runs on-device through the Neural Engine; nothing leaves your Mac. Available options depend on your hardware — Apple Silicon laptops support the full set; Intel Macs and external cameras may show fewer.
| Effect | What it does |
|---|---|
| Center Stage | Auto-tracks your face and keeps you centered as you move. Great for lively narration; turn off if you want a fixed framing. |
| Portrait | Blurs the background behind you (depth-of-field effect). Useful when your room is messy or you want the focus on you, not the wall. |
| Studio Light | Brightens your face and dims the background. Compensates for backlit setups (a window behind you) without buying a real key light. |
| Edge Light | Adds a subtle rim of brightness around your silhouette so you stand out from the background. Pairs nicely with Portrait. |
| Reactions | Triggers AR effects (hearts, fireworks, thumbs-up, etc.) from hand gestures. Disable while recording tutorials — you don’t want a celebratory firework when you scratch your nose. |
| Background | Replaces or blurs the background entirely (different from Portrait, which just defocuses). On supported Macs you can pick from preset scenes or upload an image. |
| Desk View | Splits the camera into a face shot AND a top-down view of your desk surface (uses the wide-angle lens on supporting Macs). Useful for whiteboarding or showing a physical demo. |
Mic mode
The bottom row of the panel toggles between Standard, Voice Isolation, and Wide Spectrum:
- Standard — the mic captures the room as-is.
- Voice Isolation — ML strips out room noise and emphasizes speech. Best for narration in noisy rooms.
- Wide Spectrum — preserves more of the ambient sound (music, instruments). Use when you want the room’s character.
Mic mode only applies if your input source supports it (Apple Silicon with built-in mic, AirPods, Studio Display).
Why this isn’t inside Screen Cut Pro
Apple builds these effects into the system camera pipeline, not into individual apps. That’s actually a feature: the same Center Stage that helps you in FaceTime helps you in Screen Cut Pro, with no per-app retraining or extra UI to learn.
Screen Cut Pro adds its own camera-related controls on top — webcam overlay position, corner radius, opacity, keyframed movement — in the editor inspector. Those govern how the recorded webcam track is composited into the final video. The system controls in this guide govern what the camera captures in the first place. See Webcam overlay for the editor side.